
 MENTIS
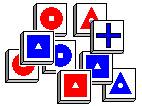
- GAME RULES -
v2.0 April 2010 - A Game by Richard Wilkins
Introduction
Mentis is a breath of fresh air for classical abstract game players, deep, challenging, and with a touch of deviousness.
The game is played by two players on a 7x7 board, with each players’ tiles lining up to face each other from opposite sides. However, the tiles start in the players’ hands, not on the board, so how they are deployed is part of the opening strategy and beyond. The aim is to capture the opponents King. Your King is a fragile piece, unable to move from his hill on your side of the board, sending out his forces of Spears, Trenchmen and Nobles to fight and defend across the board. The ruleset is quick to learn. How those rules are unleashed is down to your strategy.
Game contents
· A gameboard
· 10 Red Tiles ( 1 red King tile, 3 red Spears tiles, 3 red Trenchmen tiles, 3 red Nobles tiles )
· 10 Blue Tiles ( 1 blue King tile, 3 blue Spears tiles, 3 blue Trenchmen tiles, 3 blue Nobles tiles )
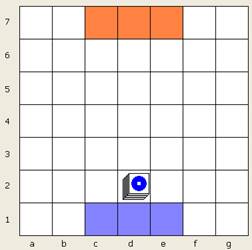
The Gameboard :-
The Blue Tiles :-
![]() King
King ![]() Spears
Spears ![]() Trenchmen
Trenchmen ![]() Nobles
Nobles
The Red Tiles :-
![]() King
King ![]() Spears
Spears ![]() Trenchmen
Trenchmen ![]() Nobles
Nobles
Game Setup
There are two shaded areas of three squares on each side of the board. This shaded area is each player’s “Hill” on which their King stands. The blue King is placed on the middle square of the blue Hill ; the red King is places on the middle square of the red Hill. The person playing blue takes the remaining 9 blue tiles into their hand, and the person playing red takes the remaining 9 red tiles into their hand. Each player should keep the contents of their hand hidden from their opponent throughout the game.
Rules Summary
The Blue player takes the first turn.
You can , on your turn, do one of, and only one of, either :-
- Move -
- Deploy -
- Attack -
If you Move on your turn you cannot also Deploy or Attack;
If you Attack on your turn you cannot also Deploy or Move;
If you Deploy on your turn you cannot also Attack or Move.
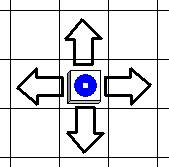
Movement Rules
Tiles move on the board squares orthogonally ( they cannot move diagonally ), forwards, backwards or sideways.
No tile can occupy or move over a square occupied by an opponent’s tile.
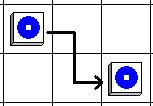
The Nobles tile can move 1, 2 or 3 squares in a turn, and can change direction within the movement turn. Note: a Nobles tile can only return to the square it started on if it drops or picks up a piece on the way ( see the “Stacking” rules below )
Example Nobles Tile
movement :-
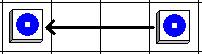
The Trenchmen tile can move 2 square per turn, no more, no less, and they cannot change direction within the movement turn.
Example Trenchmen Tile
movement :-

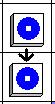
The Spears tile can move only 1 square per turn.
Example Spears Tile
movement :-
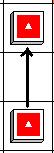
The King tile can move only 1 square per turn. The King can only move on the Hill ( the three shaded squares of their colour ) and nowhere else – i.e. a King is restricted to those three squares.
No tile, other than the King, can move either on or across either King’s Hill.
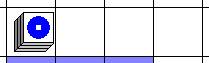
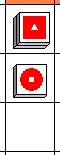
Stacking rules :-
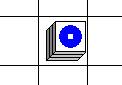
Tiles of the same colour can occupy, or move across, squares occupied by other tiles of their same colour, so long as no square contains more than three tiles, either during or at the conclusion of a move. Tiles occupying the same square will be referred to as a “Stack”.
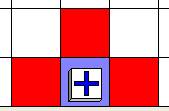
An example “Stack” of
three same coloured tiles :-
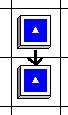
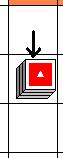
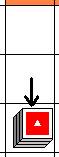
A tile can only join a Stack by being placed on top of the Stack ( i.e. you cannot move a tile to Stack and place the tile on the bottom or in the middle of the Stack ).
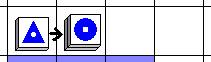
Example, a Trenchmen
tile joing the top of a Stack of two other tiles :-

The Move After
the Move
Tiles below the top of a Stack remain hidden by the top tile. Neither player can look through a Stack to try to see what tiles are within the Stack.
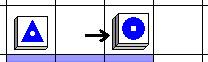
During a turn, all tiles may pick up or drop off tiles on squares they travel from, to and across. Tiles are dropped-off from the bottom of a Stack only, without changing their order within the Stack.
Example of dropping
tiles during a move :-
The top tile is Nobles,
so we get to move 3 squares…
A Stack of three tiles
( Spears, Trenchmen, Nobles )… dropping Spears, moving two …
moving two again… …and completing the
move dropping Trenchmen
before the third and final square is
reached.
Example of picking up tiles during a move :-
The top tile is Trenchmen,
so we get to move 2 squares…
A Stack of two tiles …
picking up the Nobles tile… and
completing the move, taking
the
Nobles tile with us.
Note: Only the tile on the top of a Stack dictates the move ( i.e. you cannot move a tile from the middle or bottom of a Stack ), though as it moves it can carry any number of tiles , from the top of the Stack to the bottom, with it.
Movement Summary
Table :-
|
King |
|
One square only, and only on the Hill |
|
Spears |
|
One square only |
|
Trenchmen |
|
Two squares only, in a straight line in one direction. |
|
Nobles |
|
One, two or three squares, in any direction, and does not have to be in a straight line.( Note: can not move back to the square it started moving from unless it drops or picks up another piece on the way ) |
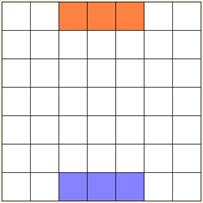
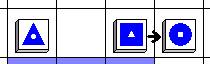
Deployment Rules
During your turn you can deploy 1 to 3 tiles from your Hand to the Board.
You may only deploy these tiles to a single square on the Board, and the square must be orthogonally adjacent to a square on your King’s hill.
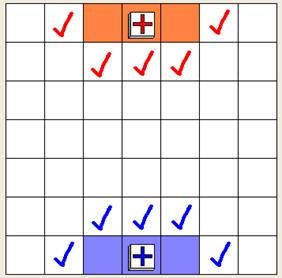
The Red player can only deploy to the squares marked above by red
ticks.
The Blue player can only deploy to the squares marked above by blue
ticks.
NOTE: You can deploy your tiles onto an empty square or to a square already occupied by any of your tiles, as long as they form a Stack no more than 3 tiles high.
NOTE ALSO: If you deploy more than 1 tile from your hand into a Stack, you do not have to reveal to your opponent the contents of that Stack.
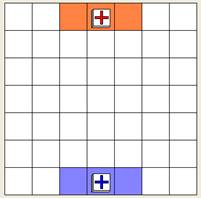
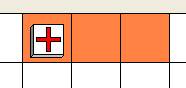
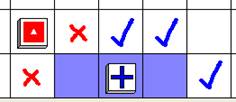
SPECIAL DEPLOYMENT RULE: You cannot deploy any tiles onto a square which is orthogonally adjacent to a square occupied by one or more enemy tiles.
As shown in this
example, the Red Trenchmen tile is preventing blue from deploying to the two
squares marked with red crosses :-
Attack Rules
On your turn you may Attack with one of your tiles. You can only attack with a tile sitting on its own in a square, or with the TOP tile on a stack.
SPECIAL ATTACK RULE: A tile does NOT move when it attacks.
When attacking a stack of tiles, only the top tile of the stack is attacked.
An attacked tile is removed from the Board and takes no further part in the game.
Tiles can only attack in one direction, either orthogonally forwards, backwards or sideways. Each type of tile has a Range of attack. The Range of attack dictates how many squares forwards, backwards or sideways an attacked tile must stand from the attacking tile.
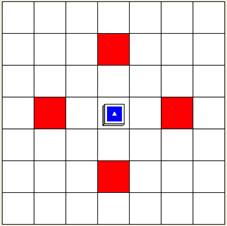
· A King tile can only attack an enemy tile which is 1 square away.
· An Nobles tile can only attack an enemy tile which is 1 square away.
· A Trenchmen tile can only attack an enemy tile which is 2 squares away, no more, no less.
· A Spears tile can only attack an enemy tile which is 3 squares away, no more, no less.
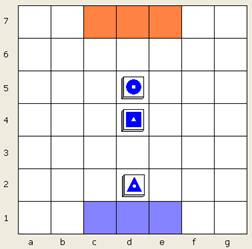
Illustration of
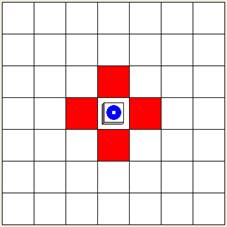
A King can only attack tiles 1 square away. Nobles can only attack tiles 1 square away
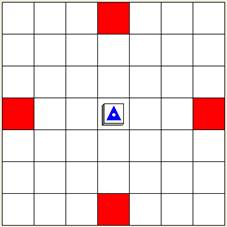
Trenchmen can only attack tiles 2 squares away. Spears can only attack
tiles 3 squares away
SPECIAL ATTACK RULE: All types of tile, except the King, are immune to attacks from another type of tile.
Hint: The type of tile it is immune to is shown by the small white symbol inside it’s tile shape.
Blocking Attacks :-
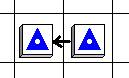
As well as being immune to attacks from one of the other types of tile, immunity also allows that tile to block attacks to other, non-immune, tiles by standing between the attacker and defender and “blocking” the attack.
A Nobles tile can also block an attack from a Trenchmen tile, and a Trenchmen tile can block an attack by a Spears tile. This means that :- if an enemy Nobles tile lies between your Trenchmen tile and an enemy tile two squares aware, then you cannot attack that tile with your Trenchmen; and if an enemy Trenchmen tile lies between your Spears tile and an enemy tile three squares aware, then you cannot attack that tile with your Spears.
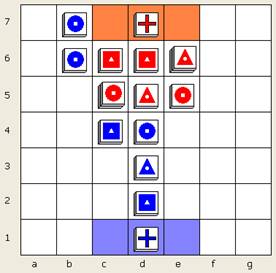
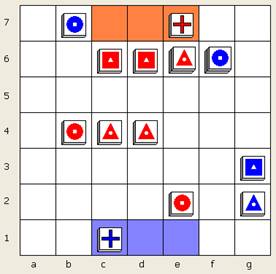
An Example :-
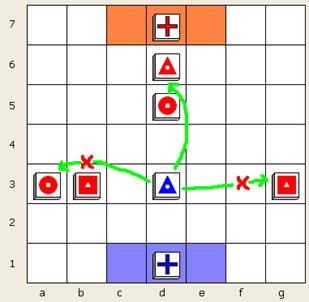
The blue Spears tile
on square d3 cannot attack the Nobles tile on a3 because the attack is blocked
by the Trenchmen tile on b3 ; it cannot attack the Trenchmen tile on g3 because
Trenchmen tiles are immune to attacks from Spears ; it can, however, attack the Spears tile on d6
because Spears tiles are not immune to attacks from Spears, and Nobles tiles,
like that on d5, cannot block attacks from Spears. Note also, it cannot attack
the Nobles tile on d5 or the King on d7 because attacked pieces must be exactly
3 squares away from a Spears attacker.
REMEMBER: an attacking
tile does not move. So whilst ( and after) attacking the red Spears tile on d6,
the blue Spears tile on square d3 remains on square d3.
Attack Summary
Table :-
|
Tile Type |
|
Is immune to attacks from, and can block
attacks from :- |
|
King |
1 |
None |
|
Spears
|
3 |
Nobles
|
|
Trenchmen
|
2 |
Spears
|
|
Nobles
|
1 |
Trenchmen
|
Ending the Game
You win the game by capturing the enemy King, or if your opponent chooses to resign the game.
A game is drawn if the same position repeats three times or if the game is not won after 50 moves. Players may also agree to a draw at any time.
Game Notation
The following notation can be used to record and play back games.
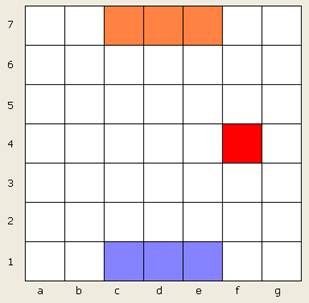
The board is divided into 7 columns, identified by the letters a to g, and 7 rows, identified by
the numbers 1 to 7. A square is identified by its two character co-ordinate of
column and row.
Example, square “f4” is highlighted in red
below:-
Movement Notation
Moves on
the board are shown as two square coordinates separated by a dash “-”
representing the square being moved from and the square being moved to. When a Trenchmen
or Nobles tile moves, since they get to move 2 or 3 squares, respectively, then
a second and third “-” dash followed by a second and third square coordinate
are added.
For
example, “a3-a4” represents a move of the tile on square a3 to the square a4.
“b5-b6-b7”
represents the movement of a tile on square b5 across b6 to square b7.
If a move
takes a tile to a square already occupied it is assumed the tiles join to form
a stack. When a tile moves away from a square and leaves ( drops ) one tile
behind then the coordinate of the square where the tile is dopped is followed
by a hash ( “#” ) symbol. If two tiles are left behind then the square where
they are left is followed by a double-hash ( “##” ).
For example, a Nobles tile moves from d2 to d5,
leaving one tile at d2 and dropping one en-route at d4 :-
Before the move d2#-d3-d4#-d5 …and
after.
Deployment Notation
The
deployment of tiles are represented by the letters S ( for Spears ), T ( for Trenchmen
) and N ( for Nobles ) followed by the co-ordinate of the square they are
deployed to. If more than one tile is deployed then the order is given from
bottom to top.
For
example, “NSTb1” represents the deployment of a stack of three tiles to square
b1, with Nobles on the bottom, Spears in the middle and Trenchmen on top of the
stack.
Attacking Notation
Attacking
is noted with the “x” symbol. The co-ordinates of the attacking square are
followed by an “x” followed by the co-ordinates of the square being attacked.
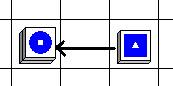
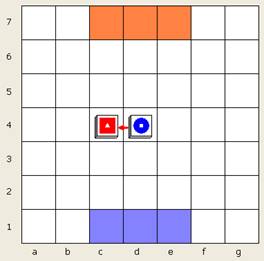
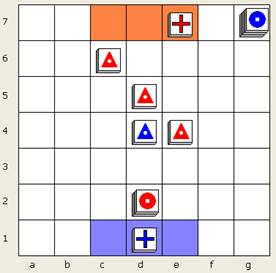
For example, the blue Nobles tile here on d4
attacks the red Trenchmen tile on c4 with the notation, “d4xc4” :-
Example Game
Blue Moves Red Moves
1. TSNd2 TSNd6
2. d2#-d3 #-d4 d6#-d5
#-e5
3. TNNc2 TSNc6
4. c2-c3 -c4 #-b4 c6#-c5
5. b4-b5 -b6 #-b7 TSe6
6. d4-d3-e3-f3 e6xb6
7. f3-f4-f5-f6 d7-e7
8. TSf1 e5-e4-e3-e2
9. f1-g1 e2xd2
10. g1#-g2 d5-d4
11. d1-c1 c5xc4
12. g1-g2#-g3 c5-c4#-b4
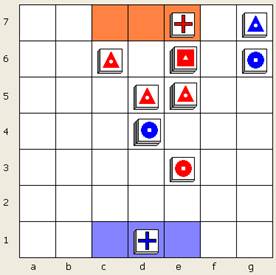
The game is
finally won by red with astonishing swiftness, as blue fought to build an
attack on f7 and g7, ignoring the mounting threat from Red. The move of a stack
of Nobles on Spears from c5 to b4, dropping the Spears en-route at c4, puts
blue’s king into an inescapable attack :-
Here is the
same game, picked up after move 5 again, but played out to a draw :-
Blue Moves Red Moves
6. TSSe2 e6xb6
7. e2#-e3 c6xc4
8.
d4-d3#-e3#-f3 e6xe3
9. f3-f4-f5-f6 d7-e7
10. d2-d3-d4 d6xd4
11. d4-e4 e6#-e5
12. f6xe6 c6-d6-e6
13. e4-d4 c5-c6#-c5
14. f6-g6-g7#-g6 c5-c4
15. b7-b6-b5 c4-c3-d3-e3
16. b5-b4-c4-d4 e3xe2
17. d4#-e4-f4-g4 e5#-e4
18. g4-g5-g6-g7 e5-e6-f6-f7
19. g7xf7 Ne6
20. g7xf7 e6-e5-e4#-e3
21. g7xf7 e3-e2-d2
22. d1-c1 d2-c2
23. c1-d1 c2-d2
Blue played
a much stronger game this time through the middle, but Red was able to force
the draw through some tactical sacrifices.
